Monday, August 11, 2014

Running a Smooth Back to School Night

You guys...seriously. School has begun?! We've been in for 3 days now and it has been a blast (but so, so exhausting). I'm still trying to get into a groove for this year but I will tell you about one thing that has gone smoothly this year...Back to School Night! My night went off without a hitch because I made sure that I was incredibly organized and ready for the night! I'm going to share a peek at my night with you and maybe you can share some tips from your night with me!

I'm going to walk you through my room as if you were a parent of one of my students. Ready?? Okay!

I have my Back to School Night set up in stations and I LOVE it!! It frees me up big time so that I'm able to meet children and talk to parents who have finished working through my stations.

First up...Sign in! I put a sign-in sheet at Station 1 so that I know who came and so I have parent email addresses in one place!


Next is Station 2!


At this station, parents pick up their child's information folder. Our school requires that parents sign a form saying that they have received all the forms so that is what the sign-in sheet is at this station.


Now let me give you a rundown on my folders. First of all, they took almost no time at all to put together! I seriously sat down one Saturday night while watching a movie with Mr. Cain and got them done in no time!


First, I glued all the covers onto the folders.

Next, I laid all the papers that go into the folder out on my floor (yikes, that's a lot!).


Then, I stuffed the pages by category. One side is for forms that have to be signed and returned. The other side has pages that are informational and can stay at home.  I put a 'Forms to Return' checklist on the 'Sign and Return' side so that parents can mark off all the forms that they have completed.
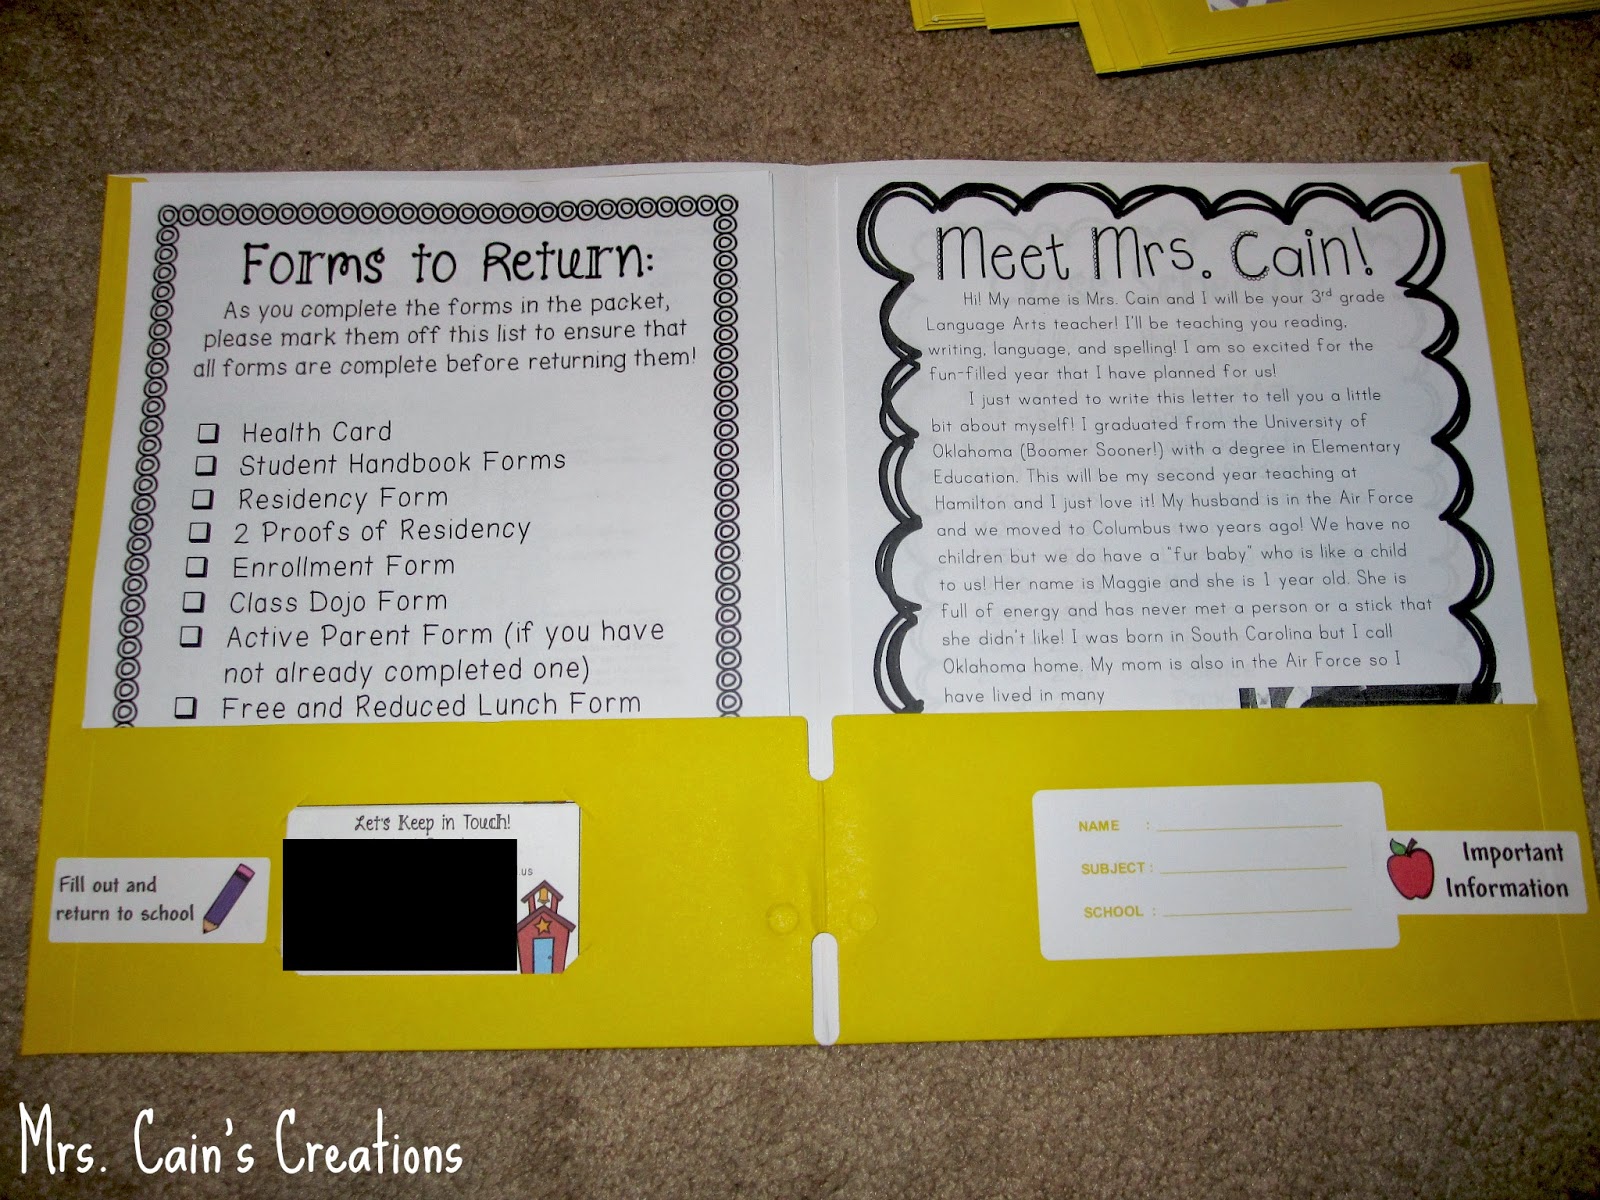


Last, I stuffed a business card into the folders that had each teacher's email address and our class website address!

Now, luckily, I was super prepared and made an extra folder just in case a new student came the night of Back to School night. Well, I didn't get a new student that night but I did have one parent walk off with another student's folder (even though they had their names right on the cover :P), so I had to give the folder-less student's parents the back-up folder so his parents could get started on his forms. Always be prepared, y'all!!

While I was stuffing folders, my dog Maggie got bored and decided to go to sleep. 


Isn't she adorable?!

Okay back to the stations... Station 3 is a station where parents tell me how their kiddos will be getting home on the first day of school and throughout the year! This station is super important so I make sure that I'm hanging out near this station so I know how all my students will be getting home.


Station 4 is a station where parents fill out an information card about their student. I don't let parents take these home because this is information that we will need right away. I put a bunch of pens at the station and make sure there are plenty of chairs around the table so that many parents can fill out forms at one time.


Station 5 is a fun station! It's our class wish list! Here I post things that we need for our classroom so that parents can donate supplies if they wish to. I ask for things like disinfecting wipes, markers, post-its, and other fun things we'll use throughout the year. I made cards for this station that are adorable but ran out of time to print and cut them so I just used apple post-its instead :) The key to teaching is flexibility, right?!


Station 6 is my supply drop-off zone. Many students bring their supplies to school on Back to School night so I had to have a way to sort and organize their supplies. I got bins and milk crates out and labeled each one using my supply label tents. I also left 2 permanent markers at the station so that parents and students could label supplies. I also had a checklist at the station so that parents could mark-off everything that their student brought.


Finally, after parents worked through all the stations, I had a PowerPoint presentation rolling on my SmartBoard so that my students and their parents could learn some important information about our classroom!


Well, there you have it! My Back to School night was so stress-free and smooth! It was great! I had plenty of time to interact with students and parents and I spent no time explaining to parents what I needed from them throughout the night!

If you are interested, you can purchase my Chevron Back to School Night Pack from Teachers Pay Teachers! It includes all the things used at my Back to School Night (plus more)! I included signs, forms, PowerPoint presentations, labels, and so much more! It is fabulous! But maybe I'm biased ;) Click the pic below to check out the preview for my pack!
 Chevron Back to School Night Pack!

I hope you found some useful information in this post! I'd love to hear about your tips and tricks for managing Back to School Night!


Saturday, August 9, 2014

You Oughta Know About...the Learning Scale!

Hey y'all! This month I'm linking up with Mrs. McClain over at Buzzing with Mrs. McClain for the monthly You Oughta Know blog hop! We'll be sharing tips, advice, websites, and products that teachers just oughta know about! Make sure that you check out the other blogs at the end of this post to discover more things that You Oughta Know!
My blog hop this month is going to be quick and to the point! School started back Thursday for me and I have been busy, busy, busy trying to make this the best year ever!! I have such a sweet group of kiddos! 3 sweet groups of kiddos actually!

I have an informal assessment strategy that you just oughta know about! It's called the Learning Scale and I'm just obsessed!!


Now, we as teachers need to constantly be assessing our kiddos. Are they getting the concept I'm teaching? Is anyone getting the concept I'm teaching? Do they already know all this stuff? The Learning Scale is one way to informally assess your kiddos over the concept being taught. The best thing about the scale: it's a quick and easy assessment strategy!


Now this is not an original idea obviously. There are variations of this scale everywhere! I just prettied it up and added clipart (thanks to Laura for the original version!). The great thing about the Learning Scale is that the kids are responsible for deciding where they are at on the scale! It's a great way for students to self-assess their learning. Self-assessment can be just as important as the assessments that we administer to our students! The learning scale asks the students to really think about how well they understand a concept. It starts at 0 with a poster that says 'I do not understand.'

The next level is a 1 with 'I understand when the teacher helps me.'


The next level is a 2 with 'I understand and can do it on my own.'

The final level is a 3 with 'I understand and can teach a friend.'


This is how the Learning Scale works in my room:

I usually have the kiddos at the carpet when I use the learning scale because it's easy for me to see all the kids quickly. I usually say something like, "Tell me how well you understand finding the main idea of a passage." Then the kids hold up their number from 0-3 (the sign language numbers on the poster are so children can be reminded of the number to hold up). Now this next part is VERY important to me. I have my kids close their eyes while we do this whole process. I don't want any kids to be embarrassed because they are a zero and their buddy is a 3. I also don't want Johnny putting up a three so he can be just like his friend Jesse. I want an accurate self-assessment and I think having their eyes closed is the best way to achieve this. I also give them a little while to think before they put their numbers up. I always tell them that they have to really look inside themselves to figure out which number they are. I also tell them that if they don't really look inside themselves and tell the truth about what number they are, I won't be able to help them when they need it.


Those are some of my kiddos up there doing the Learning Scale. Creepy happy faces, right?! They were telling me how well they understand our class rules. That's the reason why everyone is a 2 or a 3!

Now for the awesome part: I have my Chevron Learning Scale posted as a freebie in my Teachers Pay Teachers store! You can download it by clicking on the pic below!

 Learning Scale Freebie!

I hope you'll use this Learning Scale as a quick and easy assessment strategy in your class!

Don't forget to check out the other blogs in the blog hop below!!


Saturday, August 2, 2014

Back to School Shopping: Dollar Tree Edition


Can you believe it's already time to start back to school shopping?! Where did the summer go?!

Today I'm going to show you some purchases I recently made at my favorite Back to School store: Dollar Tree!!

Y'all Dollar Tree really came through for me in the organizing department. I am so ridiculously excited to get my organize on!

Check out my purchases:


YESSSSSS!!!

Okay now let me tell you what I plan on doing with all this stuff.

First:
I got this really cool toy organizer on a local yard sale page and I was so excited!

The only problem: the bins did not match my color scheme at all. The bins that came with it are primary colors and my classroom has definitely more of a bright color scheme.


I almost just sucked it up and used the primary colored bins. I would have sat and stared at them all year and loved it while I was hating it. Then I realized something: hey, I've got a lot of fun bins from Dollar Tree. Maybe some will work?


OH.MY.WORD. How is it possible that these bins worked perfectly?! Now my bins match my classroom perfectly and all is right in my classroom :)

Okay onto my next organizational project:

In my class, I use tables. I love them. Even when I didn't have actual tables I used "table groups" which were just desks pushed together. I also use community supplies because I just can't handle dealing with kids not bringing/having the correct supplies with them (remember we're departmentalized). So last year I started using what I called "table baskets." Each table had a table basket with all their supplies in it (glue, crayons, scissors, and colored pencils). They kept their table baskets on a book shelf and when we needed to use the supplies, they got them out. Now being the organizational nut that I am, I couldn't just have a bucket full of supplies with no rhyme or reason. Everything had a place. They worked fabulously. The kids new how to keep them organized and we were never hunting for supplies. The only problem with last year's table baskets:

PRIMARY COLORS!

I really don't have anything against primary colors. They just don't match my room! And I'm a matchy-matchy person!

Honestly, my baskets would have lasted at least another year but they just don't match! So I went to Dollar Tree with fingers crossed and wouldn't you know, their new colors match my colors perfectly! So I got everything I needed to create new table baskets!

Now I'll show you how I assemble my table baskets. Here are the supplies you'll need:


Square baskets, sandwich boxes with latches, cups of some sort, labels

Notice that I'm missing a matching pink sandwich box?? It took a few trips to find that one. When I bought these boxes they were still in the process of stocking all their new stuff and hadn't received the pink boxes yet.

Next, I put my crayons in the sandwich boxes (there will be crayons in them when kids come). These boxes are great! The lids never pop off because they have the latches and they are really easy for the kids to use. I stand them up with the latches on the side and slide them in on the side of the square basket.


Next, I load the scissors and colored pencils into these fun cups that I found on the baby aisle (they're supposed to be sippy cups, but I tossed the lids and now they're scissor and pencil holders)!


Next, I load up the glue. I didn't have any glue bottles to show you but last year I just lined them up on the side opposite of the crayon box.

Finally, I labeled the table baskets with coordinating labels! Love them!!


And there you have it folks! Cute, bright, ORGANIZED table baskets for super cheap from the Dollar Tree!

A lot of the other baskets will be used throughout my classroom to hold supplies or trash when we're doing cutting projects (I got a bucket for trash to match each table basket!). Hopefully that'll solve the issue of tiny pieces of paper all over the floor!

I hope that you got some ideas for (CHEAP) organizational goodies to use in your classroom next year!

Stay tuned for a classroom reveal post, a teacher binder post, and a post on how I do Parent Night!


Saturday, July 12, 2014

You Oughta Know About...Bunting with Brads!

Hey y'all! This month I'm linking up with Mrs. McClain over at Buzzing with Mrs. McClain for the monthly You Oughta Know blog hop! We'll be sharing tips, advice, websites, and products that teachers just oughta know about! Make sure that you check out the other blogs at the end of this post to discover more things that You Oughta Know!
Now I think you oughta know about......my super secret bunting trick!

I love bunting banners as much as the next teacher. Actually I probably love bunting a little bit more than your average teacher. I use it for everything! See evidence below......

Mrs. Cain bunting over my desk

Plastic bunting on my main wall

Focus Wall bunting on my bulletin board

And I couldn't even find pictures of my 'Book Recommendations' bunting! Do you believe I have an obsession now?! 

Now my FAVORITE bunting is bunting that I make myself. Can you guess why?? BECAUSE I CAN PERSONALIZE IT (hence the name bunting, welcome bunting, and bulletin board title bunting). Now I could make bunting all day long, y'all. I created a template on my computer so I can either add a background on my computer, add letters, print it out, cut, and laminate OR I can just add the letters, print it on colored or patterned paper, cut, and laminate. The possibilities are endless!!

BUT......

There is one thing that I was super annoyed with when I started making my own bunting.......

RIBBON!!!

Now I love the idea of ribbon. But I just can't stand to use it! It is so annoying! You have to make sure that your ribbon pieces are all the same length or your bunting will look wonky. After you make sure that the ribbon is cut to the same length, you have to make sure they are tied exactly the same or else your banner will look wonky. Don't even get me started on the fraying madness! All that to say, ribbon and I do not get along.

Fear not friends! I have come up with a solution! No longer do you have to deal with fussy ribbon when making adorable, personalized bunting for your classroom! Instead of using ribbon to connect my bunting triangles together, I use...

WAIT FOR IT......


BRADS!


Insert the hallelujah chorus here y'all.

Brads to the rescue! Now some of you may be thinking...but brads are gold and ugly and don't match my beautiful bunting at all! I've got you covered there, too! Your local craft store carries tons of different varieties in the scrapbooking/paper crafts section! 

Okay, now let me show you how to do this:

Supplies: your bunting triangles, a hole puncher, and some pretty coordinating brads


NOTE: You have to make sure that your hole puncher punches a smaller hole than the heads of your brads. Otherwise, your brads will slide right out and won't hold your banner together.

ALSO NOTE: If you don't laminate your bunting, you could probably just stick the brads right through the paper. I laminate mine for durability so the hole puncher is necessary!

Here we go!

First. Lay out your bunting triangles in the order that they go in (I'm using my Chevron Welcome Banner that you can find as a freebie HERE!)


Second. Punch a hole in the top corners of each triangle. NOW BE CAREFUL! Don't punch the holes too close to the edge of the triangle or the brads can tear the paper and fall out. Also remember: unless, you're going for a completely uniform look, don't punch holes in the top left corner of the first triangle or the top right corner of the last triangle. They won't have another triangle to attach to!


Now go through and place the second triangle over the first triangle. Insert the brads and fold them down on the back of each set. Keep doing this until you have a beautiful bunting banner!


Now once you hang your banner, you may notice that the prongs on your brads are hanging out like this......


Once your banner is hung you have two options to solve this issue:

1. Just turn the brad heads on the front until the prongs disappear and pat yourself on the back.

2. Do the same thing and then tape the brad prongs down on the back if you think they'll move around a lot.

Option 1 always works best for me and I've never had a problem with the prongs showing once I turn them all the right way :)

Well there you have it friends! Beautiful bunting for your classroom without all the hassle of annoying ribbon!

I hope you enjoyed this tip!

Make sure to check out the other blogs below for more great things You Oughta Know!


Friday, June 27, 2014

My Summer To Do

Ohmyword. I CANNOT believe that summer is almost halfway over! Slow down, summer. I have way too much to do before school starts! I'm going to share with you all 857647856 things I want to do so that maybe you can get some ideas of things to do in your class and so that maybe I won't forget all I plan to get done this summer! :)

1. Finish reading the second edition of the Daily 5 and read The Cafe Book for the first time! I did a modified version of Daily 5 last year (don't we all) and I just loved it (more on that later). Of course, when I heard that the second edition of the Daily 5 was out, I knew that I had to add it to my summer reading list! I'll let you know how that goes :)


2. Recover these beauties: 
These milk crates were so beautiful at the beginning of the year (see bottom pic). Pride beamed from my heart every time I looked at them (even though Mr. Cain was mostly responsible for them:)). Well you can imagine how they look now. Dirty handprints, footprints, glue and FRUIT PUNCH (???) are all over these things. Not to mention, one got broken in HALF! I'm not even kidding. One little sweetie was a little overzealous when he went to sit on one and broke it clean in half (note to teachers: don't try to be thrifty and piece together the end pieces to get one full board out of the leftover particle board). Luckily the child wasn't hurt and he was actually pretty impressed with himself (ninja skills, anyone?).

3. Redecorate this nightmare:
Um that little fur ball looking thing is a pile of dirt I swept up, not a dead animal. Promise.

Oh the joys of packing up your class for summer. I went up to the school a week ago and completely forgot that I left my classroom looking like this. What chaos! Hopefully the floors will be all waxed and ready to go soon so I can get to work! I plan to cover all my bulletin boards in black fabric (i'm obsessed with the way it makes colors pop). And y'all see those tables there? I had to scrounge for those babies! Last year I had two tables and 4 pods of desks made into tables. Well now I have all tables and I'm thrilled, but they don't match. And my little OCD heart aches when I look at them. I thought about covering them with contact paper but I haven't found any contact paper that isn't woodgrain or roses. Suggestions??

4. Re-do my morning work:
Last year I created what I called "Early Bird Work" for my students to do every morning. It was just a short, half-page assignment that the kiddos did every morning when they came in. It covered language and spelling skills and I loved it. Well now I want to re-do it so that I'll have the whole year ready to go (instead of creating a new one for the week on Sunday night and panicking to get it copied [I mean, what? I'm always prepared]).

5. Common Core Units (say whatttt???)
So lately all I have been hearing is that we need to be teaching in units if we want to have any hope of our children passing the PARCC assessments (which we'll be taking for the first time this coming year...YIKES). So I guess I should get around to planning some units because I want my kiddos to have the best chance of passing that test for sure. How are these units going to work with D5?? Anyone? Anyone? Bueller...

6. Put together the most fabulous teacher binder ever:


That's my binder from last year. And I made everything in it. And I loved it. And it was fabulous and saved my life. I think I have a binder addiction (#teacherprobs). So now that I've taught for a year and have a better idea of what I need all year, I'm re-doing my teacher binder and it is going to be even more fabulous than the original. I'll post about my binder when I finally get the thing assembled and I'm sure I'll put in my TPT store if you're interested :)

Well if you made it through all that, you're the best! And to show you how much I love you, here's a little freebie from me to you, Pinkie Lou (Grease, anybody?). This is the first thing that I have actually gotten finished for my classroom this summer (impressive, I know). A welcome banner to welcome all your sweet darlings and all the guests into your class! Just click the picture below to snatch it up!

 Welcome Banner Freebie!

So now tell me...what's on your teacher to do list??